518
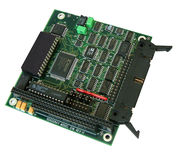
Model 518 is a smart, eight-channel sensor measurement system on a PC/104 board. It provides excitation for passive sensors and signal conditioning for thermocouples, RTDs, thermistors and strain gauges. Each channel can be independently configured to measure voltage, resistance, or any supported sensor type.
Contents |
Windows drivers
The Windows 7 hardware device driver is current and should be used in all new designs. An earlier, legacy driver is available for system builders who use Model 518 in legacy applications, but the legacy driver is no longer supported by Sensoray and is not recommended for new designs.
The driver can't detect hardware devices because PC/104 lacks plug-and-play functionality. Instead, the I/O address of the 518 must be specified when you install the driver. If you specify an incorrect address during driver installation, application programs will not be able to communicate with the board or detect it via hardware signature.
Note that the address you specify during driver installation may not match the address assigned by hardware address selection shunts. This is because some CPU boards remap or window the PC/104 bus I/O space in order to prevent address conflicts with on-board I/O devices. If you are unable to communicate with a board after installing the driver, it is recommended to consult the CPU documentation or your CPU supplier to determine if this is the problem.
Installing multiple boards
As noted above, the board address must be specified when you install the driver. The driver is specific to the board you specify when you install the driver and will only communicate with that board. If you are installing more than one board then you must install a driver (and specify a unique address) for each board.
Compatibility
- Windows XP
The Windows 7 driver is compatible with Windows XP.
- Windows 10
The Windows 7 driver is compatible with Windows 10 but must be installed using Compatibility Mode. Note, however, that in some cases the operating system may require special Windows 10 driver signing. In such cases the system will not allow you to install the Model 518 driver.
-12V power supply
- My SBC doesn't provide -12V power to the PC/104 stack. Does the 518 require -12V power?
518 boards earlier than Rev V require -12V power (Rev V and later boards do not). Unfortunately, as you have discovered, some SBC systems omit the -12V supply even though it's required by the PC/104 specification.
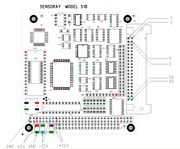
You can check for the presence of the three required power supply voltages (+5V, +12V, -12V) by probing the test points shown in the image on the right. If -12V is missing then you must connect a -12V power supply to your SBC, which in turn must apply the -12V to the stack in conformance with the PC/104 specification. When you do this, be sure to connect the positive terminal of the -12V supply to your +5V/+12V returns so that all three supplies share a common ground.
Many SBC's provide a connector pin or terminal block for -12V. Please refer to your SBC documentation for details, or contact the SBC manufacturer if this is not covered in the documentation.
Sensor data is all zeroes
- Sensor data is all zeroes after a reset. What could be the problem?
First verify that you have applied the required power supply voltages to the board. If so, the problem may be caused by not waiting long enough after a board reset.
An A/D conversion is not invoked when you fetch sensor data; this simply returns the most recently acquired sample. If no conversions have been performed yet, the sensor data will be zero. When the board is reset, it will perform a calibration cycle before it starts scanning sensors. So, after a reset, you must wait long enough for a calibration cycle, plus a complete scan of all sensors, before you will be able to read valid data (approximately 350 ms).
Connectors
Analog connector
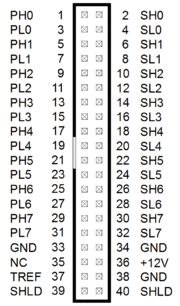
The analog connector pinout is shown to the right.
For each sensor channel x (where x is in the range 0:7):
- PHx/PLx supply excitation to a passive sensor, if needed
- SHx/SLx are the differential analog inputs
TREF and +12V should only be used to supply operating power to an external thermocouple cold junction compensation sensor, which is unnecessary if thermocouples are not being measured.
PC/104 key pins
PC/104 bus pins B10 and C19 are designated as key pins. Some modules (especially power supply modules) use these pins for ground connections. On other modules these pins are removed and key plugs are installed in the associated stack-through socket holes. On model 518 these pins are configured as bus pass-throughs (Sensoray does not remove the pins or install key plugs).
If you need to stack a 518 board onto a board (the 518's "base" board) which has key plugs, there are two options:
- Modify the base board. Remove the key plugs from the lower board. Typically this can be done by prying up the plugs with a sharp pin and then pulling them out.
- Modify the 518 board. On the 518 board, cut pins B10 and C19 and, if necessary, install key plugs. Note that once this is done, the board can no longer be replaced under warranty, and it may not be repairable if the wrong pins have been cut.
Twisted pairs
If desired, twisted pairs can be used in field wiring to reduce common-mode noise:
- An independent twisted pair should be used for every differential input pair (e.g., SH0/SL0).
- If excitation is used, an independent twisted pair should be used for every excitation signal pair (e.g., PH0/PL0).
Revision V changes
518 Rev V incorporates a number of major changes:
- A new, larger FPGA now encapsulates logic that previously was implemented in many separate components. Absorbed parts include old FPGA, microprocessor, RAM, ROM, PLD and generic MSI devices.
- Analog circuitry has been shrunk by using smaller components.
- Board assembly was converted from double- to single-sided: all components are now located on the topside.
- A DC-DC converter was added; the board now obtains all operating power from PC/104 5VDC (±12V no longer needed).
Rev V boards are designed to be direct drop-in replacements for earlier versions. To that end, these attributes and behaviors have been preserved:
- Fully complies with PC/104 mechanical and electrical specs.
- Important mechanical features are identical: all connectors and configuration shunts have same placements, orientations and markings.
- Identical connector pinouts and functions.
- Firmware is unchanged (version 2.25).
- Channel scan timing is unchanged.
- All analog functions and specifications are unchanged.
These attributes and behaviors have changed:
- ±12V power consumption changed from 840 mW to 0 mW.
- 5VDC power consumption changed from 500 mW to 1500 mW.
- Board power consumption changed from 1340 mW to 1500 mW.
- On-board clock frequency increased. As a result, boot-up time (fault duration after reset) is shorter and commands execute faster.
Revision Y changes
Rev Y changes:
- Address decoders have been added to implement full 16-bit I/O address decoding.
- Shunt locations have been added to expand choices for user selection of the board's base address.
Although the board decodes all system address lines, some board address bits do not have an associated shunt position. These board address bits (marked "---" in the table below) are implicitly programmed '0', and thus require the associated system address lines to be '0' when accessing the board.
System address:  A15  A14  A13  A12   A11  A10  A9   A8   A7   A6   A5   A4   A3   A2   A1   A0
Shunt position:  E14  ---  ---  ---   E10  E9   E8   E7   E6   E5   E4   E3   E2   E1  ---  ---
Board address:    N   '0'  '0'  '0'    N   N    N    N    N    N    N    N    N    N   '0'  '0'
Nibble bounds:  |                   |                   |                   |                   |
where: N = '0' when shunt installed; N = '1' when shunt removed
- Example
Set base address to 0x02B0:
0x02B0 = binary 0000_0010_1011_0000
Install E14, E10, E9, E7, E5, E2, E1
Thermocouple reference junction sensor
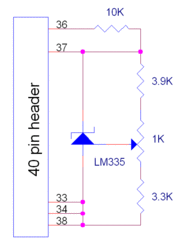
When using thermocouples, an external sensor is required to measure the reference junction temperature. This sensor is built-in on Sensoray breakout boards such as model 7409TB. If you are building a custom termination system, you can use the circuit shown to the right to implement the sensor.
To trim the sensor:
- Connect a precision thermocouple to the termination system
- Bring the thermocouple measurement junction to a known temperature
- Wait for the sensor and reference junction to reach thermal equilibrium
- Adjust the trimpot until the 518 board reports the correct temperature
Troubleshooting
Here are some troubleshooting techniques you can use if you encounter problems with a 518 board:
- Verify that all required power supply voltages are applied to the board and that they are all within the specified tolerances.
- Make sure the latest device driver and DLL are installed; these can be found here on the Downloads tab.
- Determine if your CPU is properly communicating with the 518: try reading the board's model number (should be 518) and firmware version (should be 2.25 or higher). If this doesn't work then:
- Check the 518's address programming shunts and make sure they match your desired board address and are correctly installed.
- Check your CPU's I/O port map. Make sure the 518 address you selected is reachable and doesn't conflict with other devices (including internal devices on your CPU board).
- Verify that you have properly connected external devices per sensor wiring recommendations.
- Measure the sensor signals at the board's 40-pin header and verify they are correct.
- If some channels are behaving normally and others are not, swap inputs between the good/bad channels to determine if the problem is the board or external signals.
- Disconnect the 40-pin cable from the 518. The data on all channels should "float" to arbitrary values. If the data values don't change, try rubbing a finger across the board's 40-pin header. If the data values still don't change -- and you have verified that correct power is applied to the board -- then it's likely the board is malfunctioning.


