Difference between revisions of "826 demo (VB.NET)"
(→DAC tab) |
(→DAC tab) |
||
| Line 78: | Line 78: | ||
;Control | ;Control | ||
| − | * Show SafeMode Settings - | + | * Show SafeMode Settings - allows channel setpoint/range controls (below this control) to display/modify safemode (vs. normal mode) settings. Note: Control Tab | SafeMode | Write-Enable Data <u>must be checked</u> to enable writing the settings. |
| + | * Sliders - output setpoint control; see S826_DacRead, S826_DacDataWrite | ||
| + | * Value - output setpoint in Volts | ||
| + | * Range - output range control; see S826_DacRead, S826_DacRangeWrite | ||
===ADC tab=== | ===ADC tab=== | ||
Revision as of 12:07, 17 May 2017
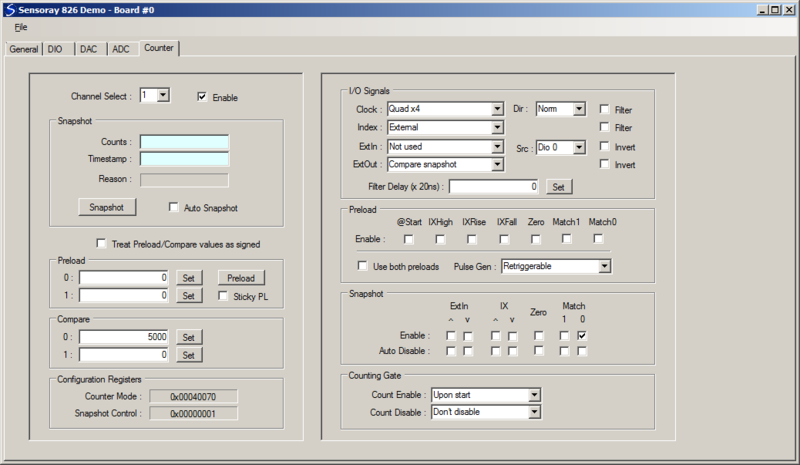
To jump-start your model 826 project, we offer a comprehensive demo that provides a GUI for nearly every hardware resource on the board. A pre-built executable is included to allow you to immediately configure and exercise the board's I/O interfaces. All VB.NET source files are provided, including a reusable module (mid826.vb) that declares all functions, types, and constants for the 826 API.
Contents |
Installation
To install the demo software, follow these steps:
- If you haven't already done so, download and install the 826 SDK
- Create a new folder for the demo
- Download the demo
- Unzip the demo into the new folder
You may now run the demo in either of the following ways:
- Run app-826-win-vb.exe
- Open the VisualStudio project (app-826-win-vb.sln) and run the demo in the VB.NET development environment
User guide
Each GUI control is associated with an API function as noted in the following sections. Please refer to the 826 technical manual for information about API functions and hardware architecture/operation, and to the 826 technical wiki for application examples.
When the demo program is started, all GUI controls are initialized to indicate the current board state. The board's state is not changed when the demo program starts, so the demo can be terminated and restarted without disturbing the board's configuration or operation.
If multiple 826 boards are installed, a dialog box will be displayed when the demo program starts which shows the IDs of all detected boards (set by board switches). You may select one board to interact with the demo, whereupon the tabs described below will appear. If only one board is detected, it will be automatically selected and the tabs will appear when the demo starts. The ID of the selected board appears at the top of the demo window (e.g., "Board #0").
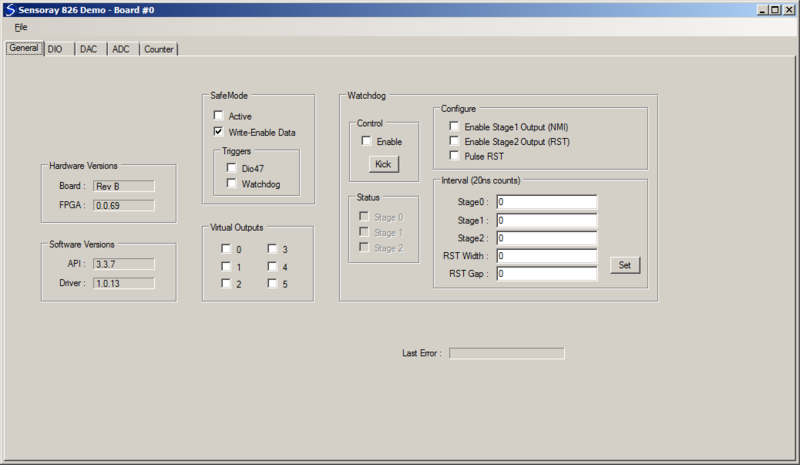
General tab
- Hardware Versions
- Board - PWB revision letter; see S826_VersionRead
- FPGA - firmware version number; see S826_VersionRead
- Software Versions
- API - middleware version number; see S826_VersionRead
- Driver - device driver version number; see S826_VersionRead
- SafeMode
- Active - SAF bit (safemode state); see S826_SafeControlRead, S826_SafeControlWrite
- Write-Enable Data - SWE bit (safemode write enable); see S826_SafeWrenRead, S826_SafeWrenWrite
- Triggers | Dio47 - XSF bit (enable dio47 triggering); see S826_SafeControlRead, S826_SafeControlWrite
- Triggers | Watchdog - SEN bit (enable watchdog triggering; see S826_WatchdogConfigRead, S826_WatchdogConfigWrite
- Virtual Outputs
- 0-5 - see S826_VirtualRead, S826_VirtualWrite
- Watchdog
- Control | Enable - enable/disable watchdog; see S826_WatchdogEnableRead, S826_WatchdogEnableWrite
- Control | Kick - kick watchdog; see S826_WatchdogKick
- Status | 0-2 - timeout status of watchdog timer stages; see S826_WatchdogStatusRead
- Configure | Enable Stage1 Output - NIE bit; see S826_WatchdogConfigRead, S826_WatchdogConfigWrite
- Configure | Enable Stage2 Output - OEN bit; see S826_WatchdogConfigRead, S826_WatchdogConfigWrite
- Configure | Pulse RST - PEN bit; see S826_WatchdogConfigRead, S826_WatchdogConfigWrite
- Interval - watchdog time intervals; see S826_WatchdogConfigRead, S826_WatchdogConfigWrite
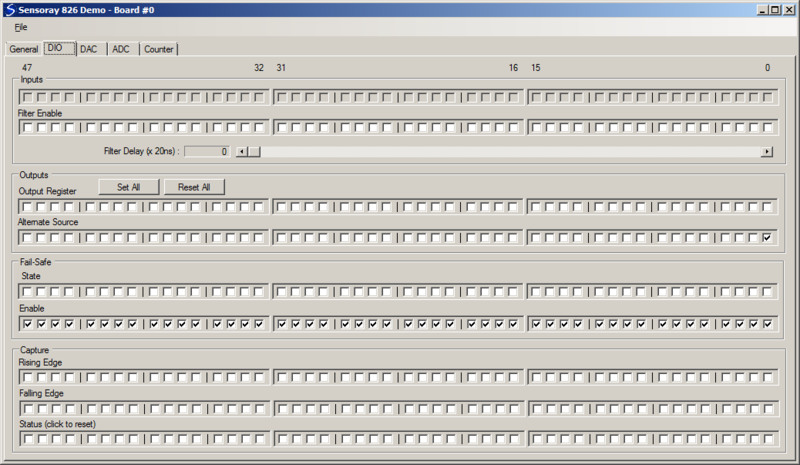
DIO tab
- Inputs
- Top row of checkboxes indicate pin states, which are automatically polled by the demo; see S826_DioInputRead
- Filters - enables for debounce/noise filters; see S826_DioFilterRead, S826_DioFilterWrite
- Filter Delay - filter time for debounce/noise filters; see S826_DioFilterRead, S826_DioFilterWrite
- Outputs
- Set All - turn on all 48 DIO output drivers (drive to 0V)
- Reset All - turn off all 48 DIO output drivers (pull up to +5V)
- Output Register - DIO output driver states; see S826_DioOutput, S826_DioOutputWrite
- Alternate Source - see S826_DioOutputSourceRead, S826_DioOutputSourceWrite
- Fail-Safe
- State - see S826_DioSafeRead, S826_DioSafeWrite
- Enable - see S826_DioSafeEnablesRead, S826_DioSafeEnablesWrite
- Capture
- Rising Edge - enable rising edge capture; see S826_DioCapEnablesRead, S826_DioCapEnablesWrite
- Falling Edge - enable falling edge capture; see S826_DioCapEnablesRead, S826_DioCapEnablesWrite
- Status - indicates captured edge (click to clear); see S826_DioCapRead
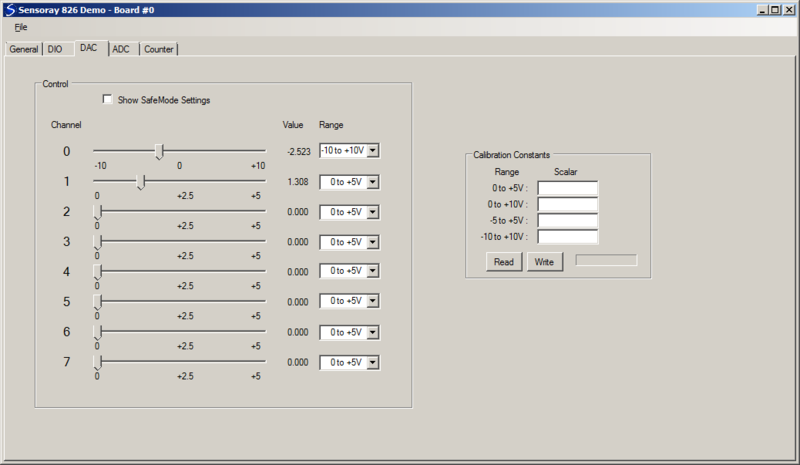
DAC tab
- Control
- Show SafeMode Settings - allows channel setpoint/range controls (below this control) to display/modify safemode (vs. normal mode) settings. Note: Control Tab | SafeMode | Write-Enable Data must be checked to enable writing the settings.
- Sliders - output setpoint control; see S826_DacRead, S826_DacDataWrite
- Value - output setpoint in Volts
- Range - output range control; see S826_DacRead, S826_DacRangeWrite
